Meraki automation using Typer
In college, one of my Computer Science professors gave us some sage advice:
Computer Scientists are lazy.
He was right. Any time I can avoid spending time writing code that isn't related to my end goal - I'm all for it. It's an added bonus if I can use a library that gives me tools to easily make my end product more polished and professional.
If you haven't heard of Typer, it's a library for building CLI applications. It boasts an easy to understand syntax, features to minimize code duplication, and options to provide auto-completion and automatic help for end users.
Overview
I recently had a migration project from a Cisco ASA to Meraki MX firewall. The ASA had about 20 static NAT entries, each of which required the same set of 10 port allowances. It sounded a bit painful to enter all of that in the GUI, and luckily Meraki has a great API! I enlisted the help of Typer to create a CLI tool.
In it's simplest form, the command line syntax looks like this:
create-staticnat <org> <net> --nat <publicIP>|<privateIP> --port <proto>|<port>
It takes in an organization and network name, a public/private IP pairing, as well as a protocol/port pairing. The result: a single static NAT entry with a single port permitted from 'any'. In my case, I needed this same syntax to work for multiple NAT entries - each with a set of permitted ports.
create-staticnat OrgName NetName --nat 192.0.2.5|192.168.5.5 --nat 192.0.2.6|192.168.5.6 --port tcp|443 --port udp|8000 --port tcp|80
The result? Two NAT entries (192.0.2.5 and 192.0.2.6), each with 3 ports permitted (TCP 80, TCP 443, and UDP 8000).
Using Lists with Typer
Typer makes it super easy to handle multiple inputs. Here's the definition of my function (and Typer command):
@app.command()
def create_staticnat(
  organization_name:str,
  network_name:str,
  nat: Optional[List[str]] = typer.Option(None),
  port: Optional[List[str]] = typer.Option(None)
):
  ....
  # Get each NAT entry
  for entry in nat:
    public_ip, private_ip = entry.split("!")

    # Get the list of ports for each entry
    for p in port:
      proto, num = entry.split("!")
I'm omitting the actual meat of my code above, but the important part of that you can ask Typer to accept a CLI option (like --nat) multiple times using this syntax: nat: Optional[List[str]]. The multiple options are presented as a Python list.
What happens if the user doesn't input any ports? They are "options" after all. The syntax = typer.Option(None) accounts for that by setting the default option to None. The result is that you can easily say:
if nat is None:
  print("I have nothing to do!")
Typer has great documentation, so don't just take my word for it: Multiple CLI Options.
Easy Documentation
It's also great to have self documenting tools. I often create a tool like this, and end up wanting to share it with other members of my team. By defining everything with Typer a --help is generated for you.
> python .\merakitools.py create-staticnat --help
Usage: merakitools.py create-staticnat [OPTIONS] ORGANIZATION_NAME NETWORK_NAME

Arguments:
  ORGANIZATION_NAME  [required]
  NETWORK_NAME       [required]

Options:
  --nat TEXT                      'publicIP|prviateIP' or
                                  'name|publicIP|privateIP'

  --port TEXT                     'protocol|portNum' or
                                  'protocol|portNum|permittedIPs'

  --uplink [internet1|internet2]  [default: internet1]
  --confirm / --no-confirm        [default: True]
  --help                          Show this message and exit.
It's so easy to do this - with Typer even accounting for things like set lists of options and true/false inputs.
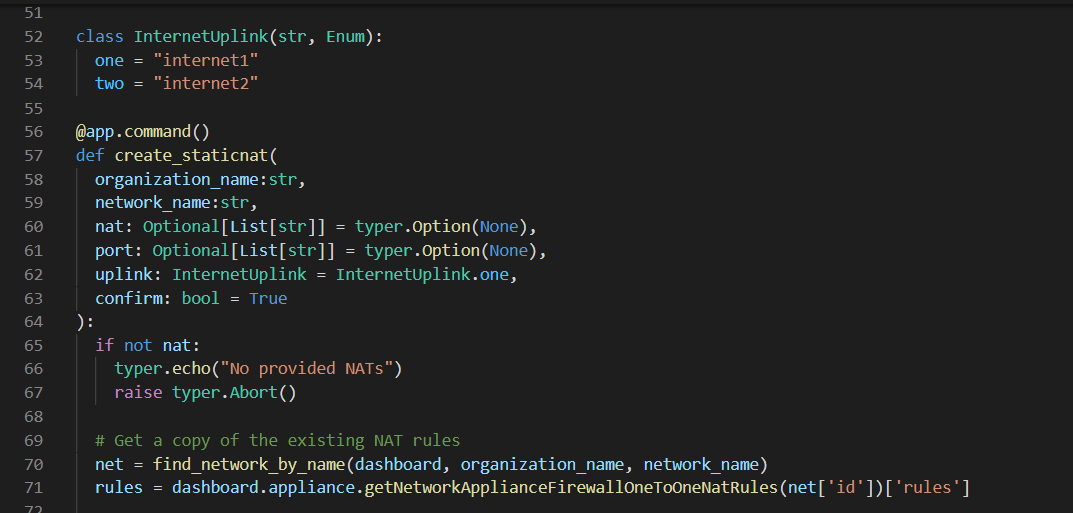
class InternetUplink(str, Enum):
  one = "internet1"
  two = "internet2"

@app.command()
def create_staticnat(
  organization_name:str,
  network_name:str,
  nat: Optional[List[str]] = typer.Option(None, help="'publicIP|prviateIP' or 'name|publicIP|privateIP'"),
  port: Optional[List[str]] = typer.Option(None, help="'protocol|portNum' or 'protocol|portNum|permittedIPs'"),
  uplink: InternetUplink = InternetUplink.one,
  confirm: bool = True
):
In the example above, the uplink option is defined using Typer's Enum - Multiple Choices CLI parameter type. This gives the user only two valid choices: "internet1" or "internet2" - which will be passed into the function as "one" or "two". This is a great way to get help with your error checking.
The confirm option is nice as well. By defining confirm: bool = True, the default option is to "confirm" input from the user. To avoid a conformation prompt, just enter the --no-confirm option.
Summary
These examples are only a couple of Typer's many great features - and if you like what you see - check out FastAPI from the same developer.
My Meraki tools project featured in the examples above is always a work in progress - and gets attention whenever there is something new I need to accomplish with the Meraki API. Please check it out on GitHub!
https://github.com/billyzoellers/merakitools
